Friday, February 24, 2012

DIY Cardigan from Crewneck Sweater!

 eco friendly sweater tutorial tutorial for refashioned sweater  
Do you love the idea of DIY projects but are afraid to start?  Here’s a super-fast, no-sew project for the nervous refashionista.  We’ll create a customized cardi from a second hand pullover, incorporating flattering design elements. 

If you’re in need of the tools for the craft I have some promotional codes for Target here. 

Materials

  • felted crewneck or collared pullover sweater
  • sharp scissors
  • pins
  • measuring tape   
  • Kilt pin, available at fabric stores

The sweater must be tightly “fulled” (also called felted) so the cut edges won’t ravel.  If your sweater isn’t felted, here’s how to do it. 
Start with a wool sweater that’s at least two sizes too big.   
One-hundred percent wool is best, but blends with at least 80-90% wool are also good.  Pure cashmere does not felt well.  Pure merino can shrink up to 50%.  A lovely blend is merino/cashmere/angora 60/20/20. 


Machine-wash sweater in hot water/cold rinse.  Check halfway through for size and felting.  The fabric is felted enough when a tiny scissors-cut on a hidden seam leaves an edge that doesn’t ravel—scratch with your fingernail to test.  If the fabric isn’t felted enough, wash it again or dry it on high.  (This process is inexact, and you may end up with a sweater that’s too small.  If so, think “hotpads” or “dog bed.”) 


Also, if you’re going to be felting very many sweaters, get a filter for the end of your washing machine hose to capture lint.
Dry the sweater flat.  When it’s dry, put it on a person or lay flat on a large surface.  Midge the Mannequin is standing in for me.


 Step 1: Cut Front


My sweater has a clear central pattern to follow, but you can also find the center with a measuring tape:  measure across the front, underarm to underarm, and mark the center with a pin.  Do the same on the bottom hem. 


Following your central pattern (as I did), or using your pins as guides, carefully cut straight up the middle front.  If your cut edges are ragged, you can neaten them up later.  
felted wool cardi tutorial
The sweater will now look like this (put a cami on, Midge!): 
felted wool sweater cardi tutorial 
Step 2: Cut Neckline

This step makes the finished piece look neater.  If you’re using a collared sweater, this step will remove the collar. 

Trim away neckband, staying close to the seam that attaches the neckband to the sweater.  If you want a wider neck opening, trim away more, being careful to be even all the way around.
bolero tutorial 025
Here’s the finished neckline:
how to refashion a crewneck into a cardi
You could also cut a wide v-neck, like this: 
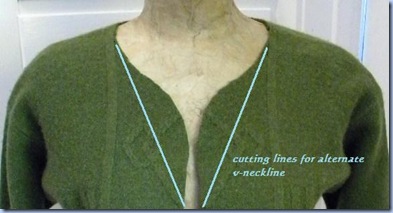
recycled sweater tutorial
 Step 3: Cut Hemline

This process is similar to shaping the neckline.  You’re going to remove any banding or ribbing at the bottom, and shorten the sweater if you want.  You can even take off several inches and make this into a cropped look. 

Just make sure you cut evenly all around.  Either carefully freehand it as I did, or use your measuring tape and pins to measure up 1”, 2”, 3” or whatever amount you’d like to remove.  I recommend shortening a little at first and increasing it as you go, trying on the sweater after each increment.   

Design note:  Hems that end three inches above or below the widest point of the hips are generally the most flattering. 

Next, trim the corners of the front opening to make a rounded edge.  You can freehand this, or cut around a teacup or other small circular item.
upcycled sweater tutorial
I removed the hem binding, and about 1” more all around. 

Step 4: Trim Cuffs

I like sleeves that are the same length as, or shorter than, the sweater’s hem.  I took off about an inch of the cuffs here. 

Removing the cuffs also makes the entire design consistent, since now all the ribbing has been removed from the sweater. 

Design note:  Three-quarter length sleeves are flattering because they elongate the line of the arm.
recycled sweater tutorial 
Step 5: Get Closure!

I love that the easiest way to close this sweater is also the most versatile.  Using an oversized safety pin called a kilt pin, you can close the sweater at the neck, bust, under-bust, or lower, depending on what you’re wearing under it.  You can find kilt pins at fabric stores.  Walmart has some very inexpensive ones. 

This way of pinning is my favorite:   
sweater refashion tutorial
Design note:  by nipping under the bust, you can create emphasis where the torso is slimmest on many women.  This would also be cute belted. 

Enjoy…!

sallymandy……….

Technorati Tags: ,

photos by B.Behan, all rights reserved.  If you like cute vintage clothes and altered vintage clothing, please check out my collection at Chronologie Vintage

. 
Thanks to Imogen at Inside Out Style for sharing many of these design elements.

Thursday, February 23, 2012

Vintage and Thrifted Clothes: Solving Common Problems

what to do about stinks and stains
Does this sound familiar?  

You find a fab vintage or thrift-store dress and bring it happily home…..only to find later that you also bought somebody’s vintage body odor.  
   
Eeew!  Talk about a buzz-kill.  Second on the list of gross smells is old cigarette smoke.  

Or you find yellowed pit stains, or mystery spots on the skirt—problems you didn’t notice at the store, in the thrill of discovery.    

Stink and Stain are two common problems with thrifted or vintage clothes.  But they don’t have to rain on your parade.  With three simple products, you can eliminate nearly all these problems at home.  These are:  table salt, Oxyclean or Biz Stain Remover, and powdered dishwasher detergent.
 
NOTE:  Before trying these, please see “Read This First” at bottom. 

Treating Body Odor and other Stinks

Body odor can be removed with a concoction of hot water and salt.

Fill your sink or a giant stockpot half-full with hot water, which will be needed to dissolve the salt.  Dissolve about 1/2 cup regular ol’ table salt (dirt cheap is fine) with a spoon, and fill up the rest of the pot or sink with cold water.  

You now have some lukewarm salty water. 

Plop in your dress, and leave it there for 24 hours, or at least overnight.  Rinse out the salty water very well and hang your dress up to dry.  The smell should be gone.  If it’s not, try the same treatment again. 

Vintage body odor often reveals itself when heat is applied to the dress armpit.  If the dress seems to smell fine after washing, but you want to know for sure, try ironing the pits and sniff them.  This is the true test.

For cigarette smoke, try machine or hand washing your garment with a cup of white vinegar in the water.  If this doesn’t get the smell out, try the salt treatment. 

Treating Pit Stains and Mystery Spots

For this problem, I use a method that’s strong enough to remove old baby formula stains—notoriously hard to get out.  I can vouch that it works on baby formula, armpit stains, and almost everything else. 

This works best on cottons and rayons, which also seem to catch pit stains the most.  Before trying this treatment, though, please see Read This First below. 

Moving right along.  Fill up your sink or big stockpot half full with hot water.  Dissolve in this:  1/4 cup *each* Oxyclean or Biz powder, and powdered dishwasher detergent (I use Cascade).  Try to dissolve 
all the little crystal-y pieces.  You need this hot water initially to dissolve them. 

Fill up the sink/pot the rest of the way with water to result in the hottest water your garment can stand.  Plop ‘er in, and swirl it around.  

Sometimes, general stains come out in a couple hours, but pit stains usually take longer.  If you’re concerned about your dress spending too much time in this detergent bath, check it every few hours to see how it’s coming.  At the end of 24 hours, or when the stains are gone, wash everything out.  

You’ll probably have a completely stain free dress that’s so clean you could serve the Pope on it.  Not that you’d want to.  

For lots of clean vintage clothes with no stains or vintage body odor, check out my collection at Chronologie Vintage.  Thanks for visiting!

Love,
sallymandy
*Read This First!  Vintage clothing can be delicate, and these treatments – especially the stain treatment -- *MAY* damage certain fabrics.   
The rule of thumb in all vintage cleaning it to try the gentlest method first.  You should only try these treatments if regular washing hasn’t gotten rid of the stinks and stains.  My logic is, if it stinks or has deal-breaking stains anyway, are you going to wear it?  Maybe you can afford the risk. 
Salt is relatively harmless, but the OxyClean/Dishwashing Detergent formula can fade and/or weaken delicate fabrics, in rare cases.  That said, I have used both these methods successfully on hundreds of garments.  I rely on them for my vintage clothes shop and my own vintage clothing. 

Saturday, February 18, 2012

Vintage Dresses Inspired by Zooey Deschanel


Here's a collection of vintage dresses inspired by the style of Zooey Deschanel.
You can click on the photos to learn more about each one.

Happy Spring!